Showing posts with label naturally dyed yarn. Show all posts

Tuesday, September 01, 2026

Dyeing with purple basil

It's funny how the color of a dye plant may or may not be reflected in the dye bath, and the color of the dye bath may or may not match the dyed yarn. The latter is so true for purple basil. The dye bath was, well, purple, while the yarn turned out green, or with undertones of green after being modified.


Day 1:
The dye bath: I used 900g of plant material, three whole plants, which is WAY more than necessary. (Note to self: shake off bugs *before* bringing plants into house.) After roughly chopping the plant material, I added it to three gallons of water and heated the pot to around 175 degrees. I maintained the temperature between 160 and 180 for an hour, then let dye bath cool overnight.

Meanwhile, I applied a cool alum mordant on 200g of Cascade 220 yarn - 4 100-yard skeins, 2 mini skeins - using 10% alum by weight of fiber (WOF), as described in Wild Color.

Day 2:
After straining the dye material from the bath, I add the (rinsed, wet) yarn, heated the pot to 170-180, and held it there for one hour. I then removed the yarn and divided the dye bath into five containers for my experiments in modifying.
  • One container - no modifier; removed one mini skein, left the other mini in the unmodified dye bath overnight to see how much darker it might get.
  • One container - ammonia modifier for one 100-yard skein (a small glug); tested the pH to confirm.
  • One container - vinegar modifier for one 100-yard skein (two healthy glugs); tested the pH after one glug, but a little off, hence the second glug.
  • One container - iron modifier for one 100-yard skein (half tsp?)
  • One container - chrome (was supposed to be copper but I grabbed the wrong container) modifier for one 100-yard skein, loose crystals in bag (1 T?)

I let them all set for "a while" (less than an hour), then rinsed and hung to dry.

Day 3:
I rinsed remaining mini skein and hung it to dry.

A few days later, I washed all the skeins with Eculen, then hung them to dry again.

And here are the results:


No modifier

Vinegar

Ammonia

Iron

Chrome

No modifier, long soak


I just love, love, love these colors. Now I am wishing I hadn't used all my plants at one time. I guess I'll just have to grow some more next year and try again.

Wednesday, May 27, 2026

Adventures in dyeing... with dame's rocket

After listening to a talk about dyeing with invasives, presented by a member of the Austin fiber guild, I looked up local invasives I could dye with. Dame's rocket was on the list.
Dame's rocket
I gathered the flower heads (700g of them) and soaked them for several days in tap water without applying heat.
700g
I then strained the dye bath (several times, including through an old jersey pillowcase). The dye bath looked like grape Kool-Aid.
Grape Kool-Aid!
Meanwhile, I divided a 100g skein of blank Cascade 220 yarn into four 50-yard skeins, plus a mini skein of the leftover bit. They received a cold alum mordant (a la Wild Color) using 10% alum.

My original plan was to use only some of this yarn, but I mindlessly threw it all into the dye bath. I heated the dye bath to 175-185 degrees and held it there for 30 minutes. Then I removed the small skein right away but left the rest to cool in the dye bath overnight.

The next day, I modified some of the overnight yarn, using vinegar for acid, ammonia for alkaline, and iron. I applied heat with the acid, which caused the yarn to bleed a bit. No heat was used for the alkaline. Heat was used for the iron, but the yarn did not bleed as much.
Gotta check the pH
The result was a range of pleasing pastels.


Mini skein removed early

Unmodified but left in overnight

Acid modifier

Alkaline modifier

Iron modifier

The next step is to set up a colorfast test using ambient light. My guess is the dye will fade to varying degrees, depending on the modifier. Perhaps this is an empty exercise, but it is fun to experiment.

Wednesday, April 29, 2026

Dyeing with avocado

Using this site as inspiration, I decided to try dyeing with avocado. But first, I had to *eat* enough avocado, not easy for me. I found that mixing avocado with lime juice (one lime per avocado) created a kind of guac that actually keeps a day or two in the fridge if the surface is protected from air with saran wrap. Definitely needs salt, though.

Unmordanted on left, rhubarb leaf mordanted on right

I stored the cleaned peels and pits in the freezer until I had accumulated enough for the dye pot, in this case from 5 avocados. On day one, I simmered them for three hours, then let the dye bath sit overnight. The next day I strained the dye bath, soaked both skeins in the room-temperature dye bath for an hour, then raised the temperature and simmered for an hour. After turning off the heat, I let the yarn sit in the bath overnight.

Mordanted with rhubarb leaf

Apparently, the pits have tannin in them, so no mordant is required. So one skein was unmordanted, but the other had been previously mordanted with rhubarb leaf. The results are close, but the color of the rhubarb leaf mordanted one looks a bit deeper.

Unmordanted

The end results turned out more brown than pink. This could be from several different causes: dye materials not clean enough, dye materials kept in freezer too long, the dyer was not careful about keeping the dye bath temp at a low enough simmer, the yarn was kept in the dye bath too long, etc. I plan to repeat this experiment with cleaner dye materials and keep a better eye on the dye bath temp, to see if I get shades of pink. I may experiment with separating the pits and peels, to see if each produces a different result.

Tuesday, February 24, 2026

Dyeing with amaranth

Amaranth is a good news/bad news kind of dye plant. It's easy to grow, but it will reseed itself rampantly. It can dye beautifully, but the color is reputed to be fugitvie. I tried dyeing with it once before, but I could not help giving it another go.

Inspired by this blog post, I used the cold water method again but this time used just the seed heads, leaves, and twigs (no stalkes), soaked in three gallons of undiluted household vinegar. That was on a Sunday.

I let that steep until the following Tuesday, when I strained the liquor and added unmordanted yarn (one skein of Cascade 220). That soaked for two days, I believe. When I rinsed it, not much color bled out.


Another unmordanted skein of Cascade 220 went into the "exhaust" for two days. Not much difference in color.


Then I dyed a skein of Cascade 220 mordanted with rhubarb leaf and a mini-skein of Cascade 220 mordanted with alum in the second exhaust bath. The rhubarb leaf mordanted skein looks a bit dull compared to the others...


... while the alum mordanted one appears brighter.


These colors are all simply luscious! Worried that they might fade, I am storing them in black cloth bags that I keep inside an opaque plastic bin. I have yet to set up a test for colorfastness.


The instructions for a warm water method using alum may be found at this site. If the amaranth reappears this summer, I may give it a try as well.

Wednesday, December 31, 2025

Lempi sweater

I created this post in July, 2024, but for some reason, never posted it. Gah! So here it is.

I can't believe I have not created a primary post about this sweater. The knitting has been long done, but I didn't consider it complete until it had buttons. I've taken it to spinning guild meetings sans buttons, but it could not go to the county fair without them. So now it is officially DONE.


Pattern: Lempi, by Tiina Kaarela
Yarn: Cascade 220, naturally dyed with a variety of materials and methods (see list below)
Needles: US8 (US6 for ribbing)
Modifications: quite a few!

I started this project in June, 2023, and sewed the buttons on June, 2024. Instead of rewriting what I posted on Ravelry, I will just copy and paste what is there.

The pattern is written in Finnish, translated to British English, and I'm struggling a bit with the instructions. Also, my gauge seems to be off, so I am knitting a swatch to double check.
The neck is *way* tighter than the photo, too.
***** The swatch reveals that even after blocking, my gauge is off. But I like the fabric that results from using US8 needles. So instead of going up a needle size, I'm going to knit a size larger.
So, I started over, but using US6 instead of US4 for the collar. Also, used an alternating long tail cast on and went right into the ribbing.
***** Some of the instructions are foreign to me. Instead of a "wrap-and-turn", they call for a "double stitch". And I could not figure out the buttonhole instructions, so I just did the usual YO-k2tog.
***** Too many errors, so ripped back almost to the beginning. Now I am using wrap and turn instead of the DS.
***** Again, with the errors! I was knitting along, fat, dumb, and happy, when I realized I had skipped two buttonholes. I tried dropping stitches and repairing the problem but ended up ripping back about 50 rows. And THEN I screwed up the spacing of the increases, so had to rip back about 8 rows to fix that. *sigh*
***** 8/21/23 - FINALLY reached the ribbing. This will be long enough to be a sweater dress.
***** Pockets. Ugh. For some reason, I have 22 stitches on one side, 23 on the other. I am going to do a k2tog on the "long" side, to even them up, as otherwise the stitches work out for knitting in the round. BUT after the pickup round, the "front" edge will be purl so that the fabric will bend, and at the next round, will purl two stitches at either "end" of the pocket, so it will fold along the edges without bulk.
***** Done with knitting and blocking, just need to sew on buttons and fix a hole that opened up under one arm.
***** Sewed on buttons made from deer antlers - UGH. Replaced them with buttons from JoAnn.
***** THIS SWEATER WON BEST OF SHOW AT THE ALLEN COUNTY FAIR OPEN CLASS COMPETITION!!!


And now, for posterity's sake, here are the details about the naturally dyed yarn:

YarnMaterialMordantModifier
Cascade 220Dahlia (dried)Cold alumIron
Cascade 220Sycamore barkNoneNone
Cascade 220Sycamore barkNoneIron
Cascade 220Onion skins - Combined dye bath exhaustNoneNone
Cascade 220Dahlia (dried)Cold alumAcid
Cascade 220Sycamore barkCold alumAlkaline
Cascade 220Dyers coreopsisCold alumAlkaline
Valley Yarn WoolQueen Anne's LaceNoneIron
Valley Yarn WoolQueen Anne's laceNoneNone
Cascade 220Onion skins -Secondary dye bath exhaustAlumNone
Cascade 220Dyers coreopsisNoneAlkaline
Valley Yarns WoolQueen Anne's LaceAlumIron
Cascade 220Tomato vineAlum and cream of tartarAmmonia
Cascade 220Dahlia (dried) exhaustNoneIron
Cascade 220Tomato vineAlum and cream of tartarIron
Cascade 220Dahlia (dried) exhaustNoneAcid
Cascade 220Onion skins - Primary dye bath exhaustAlumNone

Sunday, December 21, 2025

Houndstooth scarf

My SO *lost* the three-color log cabin scarf I wove him last year, so the replacement is something easier: houndstooth.


Pattern: none
Weave structure: houndstooth
Loom: Ashford SampleIt
Warp: Cascade 220, naturally dyed with rhubarb leaf (light color), mordanted with rhubarb leaf and dyed with rudbeckia and modified with iron (dark color)
Weft: Same as warp
EPI/PPI: 7.5/7.5
Ends: 42
Finished size: 59"L (without fringe), 5"W
Finishing: hemstitched ends and knotted fringe


Really, the only weave structure that could be easier would be a one-color plain weave. For houndstooth, the warp alternates two strands of each color, the weft the same.


I wasn't sure about how the colors kind of candy-stripe up one side, thought I might need to crochet over the selvages, but no, I like it just the ways it is.


In fact, I am a little embarrased about how much I admire the scarf whenever he wears it. Good job!

Tuesday, September 23, 2025

Dyeing iron-mordanted yarn in rudbeckia dye bath

One thing I have to say about iron mordanting: DON'T. It takes much less work to do a cool alum mordant and an iron afterbath than to do the iron mordant up front. Also, one has more control of the outcome.

I didn't keep very good notes about this whole dye experiment, nor very many photos. At least the photos I did take have a date-time stamp, so there is a timeline of sorts.

First, I gathered flower heads from Rudbeckia fulgida var. sullivanttii 'Goldsturm' growing in the area of my yard I refer to as The Meadow. These I left to soak in water for several days.


Next, I heated the flowerhead bath for an hour or so, to extract the dye and let it cool overnight.


Meanwhile, I mordanted four small skeins of handspun wool singles in an iron bath. Those I rinsed thoroughly, as iron can be hard on fiber.


Over the next several days, I added a skein to the dye bath, heated the dye bath for an our or so, then let it cool before removing the yarn. I processed one skein at a time, hoping to gain variations in the depth of color. It didn't work like I expected - all I got was dark gray with little variation. I finished by dyeing a skein of rhubarb leaf mordanted Cascade 220.

The handspun singles all look about the same, even the ones that were put into an "exhausted" dye bath. The skein of Cascade 220 that was not iron-mordanted but mordanted with rhubarb leaf came out dull, which I suspect is an aspect of the rhubarb leaf mordant. At least it looks different from the others.


So what did I do wrong? For one thing, I neglected to weigh the plant material, to get an idea of just how much yarn could be dyed with it. Mordanting the yarn with iron I believe corrupted the dye bath, so I ended up with dark gray yarn instead of the dark green I was aiming for. I was not careful, nor did I take my time and plan things out before hand. Hopefully, lessons learned!

Tuesday, May 14, 2024

Another Lozenge Cowl

In an attempt to use up the rest of the yarn from the Wabash Woollen Works natural dye workshop, I knit another Lozenge Cowl. Mission almost accomplished. All that remains is some madder.


Pattern: Lozenge Cowl (free Ravelry download), by Raging Wool
Yarn: merino sport weight (about 100g), MC = hollyhock, walnut, eucalyptus, marigold, onion skin, madder, CC = sumac, Queen Anne's lace, madder (acid modifier)
Needle: US5
Modifications: Used Old Norwegian cast on and suspended bind off

A black and white version of the above photo reveals that the contrast in values between the onion skin dyed yarn and the acid modified madder is not as deep as I would have liked, but not too bad.


The main color is knit in garter stitch. If I had paid attention, I would have avoided this bit where the change in colors is not very smooth. (Is there a name for this knitting result?)


The back is not as tidy as the previous Lozenge Cowl. I have a tendency to knit stranded colorwork too tightly, but I overcompensated too much in this version. I would not enter this project in the county fair.


I showed this to my spinning peeps, and they declared it good. Their opinion is all that matters, right?

Wednesday, August 02, 2023

A-dyeing we will go

Last Saturday thirteen of us local fiber artists (plus a few from elsewhere) met up at Wabash Woollen Works for a natural dye workshop. I've been organizing this for several months and felt a bit anxious about it even though once everyone who wanted to go had signed up and paid the fee, it was really out of my hands. A good time was had by one and all, with gorgeous, saturated colors from every pot.

Eight of the pots were set up outside under an overhang, while two were inside on the stove (only because Lisa has only eight stand-alone induction burners). The weather cooperated, so while it was warm, it wasn't unbearable in the shade. We helped collect spent hibiscus blossoms and fresh marigold flowers from the garden (which was at its peak). The other outside pots were for Queen Anne's lace, black-eyed Susan, onion skins, walnut, hollyhock, and staghorn sumac. Inside, we worked with madder and with eucalyptus leaves.


(What dye material that isn't used immediately, like these hibiscus blossoms, is laid out on a screen to dry.)


The outside pots simmered their dye materials, then the dye stuff was removed and the yarn (merino) added. Inside, the eucalyptus had been simmering for *days* (burner turned off at night) and the leaves were left in the pot when the yarn was added. The madder required more attention, so as the most anal person in the group, I volunteered along with another who later paled in comparison to my anal-ness. We had to mix up the madder, then add it to the pot, then monitor the pot so that the temperature stayed between 140 and 160; above 160 ruins the dye. And the yarn had to simmer in the madder dye bath for three hours.

Mixing madder

Looks like spaghetti in tomato sauce

The yarn picks up the fragrance from the eucalyptus

Rinsing the eucalyptus dyed yarn meant shaking out all the leaf fragments. Similarly, there were crumbs of madder clinging to the yarn in our pot, most of which rinsed out. I think a change to the protocol I would make is to create more of a paste with the madder, then sieve it to trap the larger bits before adding it to the dye bath. But that is just (anal) me.

One very important lesson I learned is the more dye materials one uses, the more saturated the color. All the natural dyeing I have done to this point has resulted in muted colors. No longer - I am dedicated to the new adage that, when it comes to dye stuff, more is never enough.


As part of our fee, we each got two skeins of yarn. Then we could purchase additional skeins for $5 each. I chose one of each color, then picked up more madder because I don't have any natural dyed reds. I also purchased ten buttons (one of which I see from the photo is flawed) that are made from deer antler, for the Lempi sweater.


I'm glad that this workshop is over, and yet I am already plotting the next field trip we can take to WWW.

Saturday, May 27, 2023

Spinning dervish

For some reason, I am really into spinning these days. Maybe because I am learning some new techniques? Or because I am spinning dyed yarn, so the colors are sucking me in? The only problem with all this spinning is I can't weave or knit fast enough to keep up with all the yarn I am producing.

Knitting: about halfway through the Simple Rules cowl.
Spinning: skeined and wet finished the chain-plied silk/tencel/merino blend; chain plied the blended Polish merino (the plying was more challenging than the silk/tencel/merino blend); working up *more* Polish merino by pairing the four colors with each other
Weaving: I had to go with tiny diamonds for the stars of the "Jasper Johns" flag tapestry, as the yarn is too bulky to make anything but blobs when I tried to weave something larger

Weaving from the back

Viewing front in a mirror

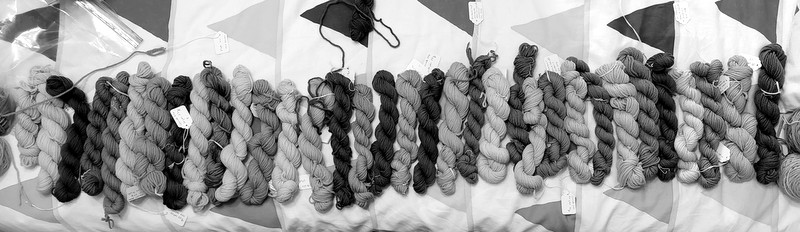
I am still itching to knit a sweater, still want to use up a bunch of naturally dyed yarn. My SO helped me lay out the yarn in a possible order. After taking this pic and turning it into a black and white version, I rearranged some of the colors.


By looking at the yarn in black and white, it is easier to see which colors are too close in tone to be next to each other.


Colors are my Achilles heel. I've been meaning to practice like @gardenercook (which I mentioned here), but just hadn't gotten a round tuit. My granddaughter came over yesterday, though, and the two of us practiced with watercolor. Now that I understand a bit how watercolor works, I feel like I can make some progress learning to mix and match colors. Maybe.